Posted on

Wiring Harness Questions and Mailing Instructions


Planning on sending us your harness or ECU? Take a quick glance over this page, making sure that you have everything sent to us at the same time, to help expedite your order.

Please fill out our Mail In Request Form.   Mail the package with the form inside, to the address listed on the form..

What type of harness do I have?

Most pre 1999.5 engines

  • Engine Control Unit (ECU). (Most mk3)
  • mk3ecu
  • Harness from Engine to ECU.
  • mk3harness
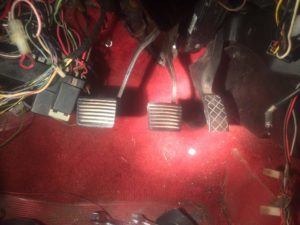
  • Accelerator Pedal connector with at least 10 cm of wire. (TDI ONLY)
  • mk3mk4 pedal (Left: Mk3; Right Mk4)
  • If you want to convert to a mk4 style pedal for your mk3 TDI just let us know, its easier to get replacement pedals, and we have a bolt in bracket from your MK4 to MK1 accelerator pedal.
  • mk1DBW1


Engine Control Unit Engine harness Accelerator pedal plug (MK3 style)

mk3tdiplug


If you are missing some of these items, no problem! We usually can supply them to you at a reasonable cost.


Most post 1999.5 engines

  • Engine Control Unit (ECU)
  • mk4 ecu
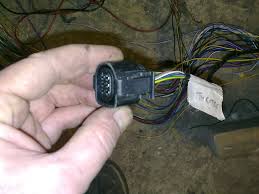
  • Large connector ECU Harness, has 4 or 5 colored plugs to rain tray plenum, (or under the beetle dash cap)
  • mk4body harness mk4bodyharness2
  • Small connector ECU Harness has the majority of the connections to the engine.
  • mk4engineharness
  • Glow Plug Relay (TDI Swaps only) with it’s base and at least 6″ of wire. (pictured is an 02-up, pre-02 is under the dash)
  • 02up glow plug relay
  • Accelerator Pedal connector with at least 6″ of wire. (pictured on the left is the mk3 connector, Right is the mk4 connector)
  • mk3 mk4 pedal harness

If you are missing some of these items, no problem! We usually can supply them to you at a reasonable cost.

Other parts you will need You will need these parts to complete your installation. However, we don’t need them to work on your wire harness, so please don’t send these parts to us, unless you just enjoy paying for shipping costs..

  • Accelerator pedal (mk4 on the right, mk3 on the left)
  • mk3mk4 pedal
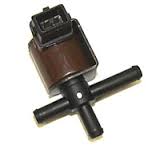
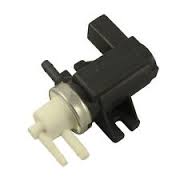
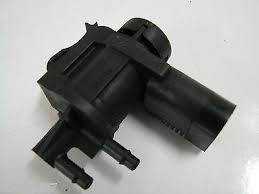
  • Turbo control valve (N75) (gas 1.8t on left, TDI on right)
  • gasn75 tdin75
  • EGR control valve (N18) *
  • tdi egr tdi egr asv
  • Intake Manifold Flap Valve  *
  • tdi asv
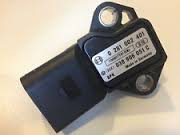
  • Manifold Absolute Pressure (MAP) sensor
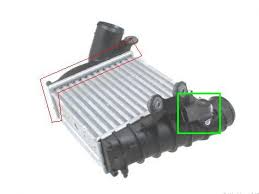
  • tdimap
  • Intercooler
  • tdiintercooler
  • Mass Air Flow (MAF) sensor *
  • tdimaf


* To make your installation process simpler for you, we can delete these items from your harness. However check local laws before doing so as you may not be able to pass certain emission tests.


How to remove your harness – 


How to correctly send us your wire harness


The fastest and cheapest way to send a wire harness is with the Post Office. If you live outside of the USA, you will more than likely have to fill out a customs declaration form, this process is quite simple! An important note: you are not selling us these parts, rather you are sending them for repair and to be returned! So when filling out the form simply write: Automotive wire harness sent for repair, no commercial value. In the value field, put one dollar. In the insurance field, insure it for whatever amount you feel comfortable with.

To help us plan our time around the arrival of your harness please forward the tracking information to our email.

If you insist on sending with a courier such as UPS / Fed­Ex you will be 100% responsible for all fees incurred.

What happens when the harness gets here?

Before starting the harness we will email you to ensure both parties are on the same page. If there are any missing parts or concerns that we may have with the harness, this will be discussed before any work commences. The harness will be sent back and labeled as a “repaired automotive wire harness.” Again, if you have any questions or concerns, please let us know!

Posted on

Install Videos !!


We have needed to do this since the first day we said, “Why don’t we ship out parts for everyone to put a tdi into their mk1” …


Well almost 10 years later, and we have a good start on a video library for using and installing our parts..


4cly Motor/Trans Parts Overview :


Hydro Clutch Kit


Mk1 DBW Pedal Install


Mk1 02a/ 02j Linkage Install


Mk1 Vr6 Hardware Overview:


Mk1 VR6 Harware Install 1&2:


Wiring Harness Removal Videos –

Mk4


Mk3


Recaro Seat Frame Install


Installing one of our “Standalone” style harnesses into a mk1 (this is a 24v but all of the connections to the car will be the same as any of our swap harnesses)


A shorter more concise version is here


MK1 02j Shift Box Install


Posted on

1980 Caddy TDI Swap

We are building a tdi swap for a customer, he sent us his 1980 caddy, an ALH out of a 00 beetle, and instruction to make it a functional truck, and a great daily driver.


  • Alh TDI swap
  • New brakes with rear disc
  • Working Ac
  • New heater system
  • 020 trans w/LSD


Onto the evidence :

Getting the truck and motor ready for a steam cleaning, 250 degree pressure washer will cut right through the old grease.


Prepping the motor for mk1 install:

  • Remove power steering, trim bracket off
  • Clock Turbo oulet
  • Remove Egr
  • Remove small idler


Trimming the cover for the motor mount:

  • Cut along the ridge of the timing cover, then straight down through the relief for the lower roller bearing
  • reinstall and check the fit with the S&P Mk1 – Mk4 bracket


  • Clock the turbo by removing the bracket and VNT vacuum pod from the exhaust side,
  • Then loosen the 6 bolts on the charge side and rotate the housing so that it is pointed up instead of down.


We installed our 020 clutch kit, the transmission, hung the rebuilt alternator and the new starter.  Waiting on the intake cleaning,  and we are almost ready to set a motor in the car.


Motor is IN!


Last thing to do is get the pedal mounted for the DBW ALH ecu..


For this to fit the way you want, you will need to trim the floor vent on the factory airbox.. its hard to see in a picture but once you hold the pedal up there you will see exactly what we mean.

Truck is outside for final fluid checks and setting the timing on the pump, hopefully we will have some driving videos from the owner soon!

Posted on

EuroTripper 5 Come See Us In Sunny Florida!!

When Eurotripper comes around in the calendar I am ready to find some warmer weather, tired of the wet and cold, GIVE ME SUN and 70 degrees already!!

So come see us at ET5, we will have stuff to fill your grab bag, parts for your project, and an empty chair if you just want to shoot the breeze.


et5


Get your event details here ET5Show

Posted on

PowerFlexUSA Bushings Are Here!

S&P is now a PowerFlexUSA distributor, we will be offering free shipping in the USA for ANY make or model they offer, and will be integrating their bushings into our swap kits.
EMAIL us for price requests, it will take some time to get their catalog onto our page.

WHY POLYURETHANE SUSPENSION BUSHINGS?

  • Increased Tire Life
  • Decreased Deflection
  • Increased Responsiveness
  • Reduced Braking Distances
  • Improved Performance
  • Increased Safety


powerflexlogo
mk1pf
Posted on

24k – Sal’s Vr6 Swapped Mk2 Golf

Sal Robertson, co-owner of S&P Automotive, bought this car a little over a year ago. Having owned and built a lot of different VWs, he decided to let this one sit for a while whilst he decided ultimately what direction to go with the car.

sp720-130

To kick things off, Sal shipped the car off to his painter to have the car resprayed in the OEM LE1V Gold Metallic, thus beginning with the car’s moniker of 24K.

sp720-113

While the car was away a low mileage 24V VR6 and a 1995 2.0 GTI donor car were sourced. The 4 lug suspension, coilovers, Nuespeed F&R sways, 10.1” brakes for a base were reappropriated, and a host of new parts from axles, and brakes, down to the tie-rods and some hot cams were thrown in the mix.

sp720-106 sp720-105

After getting the car back, Sal went to town. Inside an awesome set of low bolster Recaros were placed in the front and matched to the OEM tweed on the rears and the door cards. The dash and plastics were re-dyed to the original dark brown, and the cluster was treated to some Autometer ES gauges to keep an eye on things under the hood.

sp720-108

The car presently rides on those pristine Ronal Turbos IIs and perfectly fitted Kumhos, but we don’t know for sure that those will be permanent…

Eurobumpers and e-code lights finish up the exterior of the car, keeping it simple and classic.

sp720-143

As far as entertainment, and the sound system… What better soundtrack could one have than a mildly massaged 2.8 24V VR exhaling through a 2.5” Borla exhaust? IMHO, none. Whilst idling, the car gently purrs with nary a loud rumble to clue you in on the work that has gone on; until you hit the pedal on the right, that is.

sp720-147

Some might call it too simple, saying that it needs some 16 by eleventy wheels, mad camber, and tires that look impossible to mount or drive on. But, this car… clean, classy, and 24K all the way.

sp720-134

Coming soon, an inside look into S&P Automotive and a few other recent builds. Be sure to check back, and hit the like button over on Facebook!

sp720-137

-CM
sr83.com


But we can’t forget about Seth’s Jetta!!!
Another fine example of S&P Original goodness, when Seth saw this thing, he had to have it.

sp720-133

It wasn’t in its current state when he bought it from Sal & Perry, it took a little of Seth’s imagination and S&P’s elbow grease to fit the 12v vr6, complete with fully polished Schrick intake manifold.

img_1535

Yea, those are common, just roll out to your local bone yard, they’re everywhere…
While Sal chose the old school feel with the golf, Seth felt that the original Recaro Trophies just werent quite what he was looking for and opted for front & rear Recaros from a Mk4 GLI.

dsc_4815 dsc_5780

Now don’t get me wrong, I’m all about keeping certain cars true to their vintage roots, but there’s a lot to be said about a slightly more modern, comfortable seat, that’ll hold you through the twisties.

img_8952

These days, low seems to be the only thing people think about when “building” a car. And though I’m a fan of all aspects of suspension and wheel fitment, I have to say, its quite relieving to come across enthusiasts these days who can build their cars and drive them, rather than garage queens and speed-bump dodgers.

img_1740x

Thanks for the opportunity to shoot your cars guys.

For more info on S&P Originals, check out their website at S&P Automotive!

-Josh
sr83.com