Posted on

VR-lequin

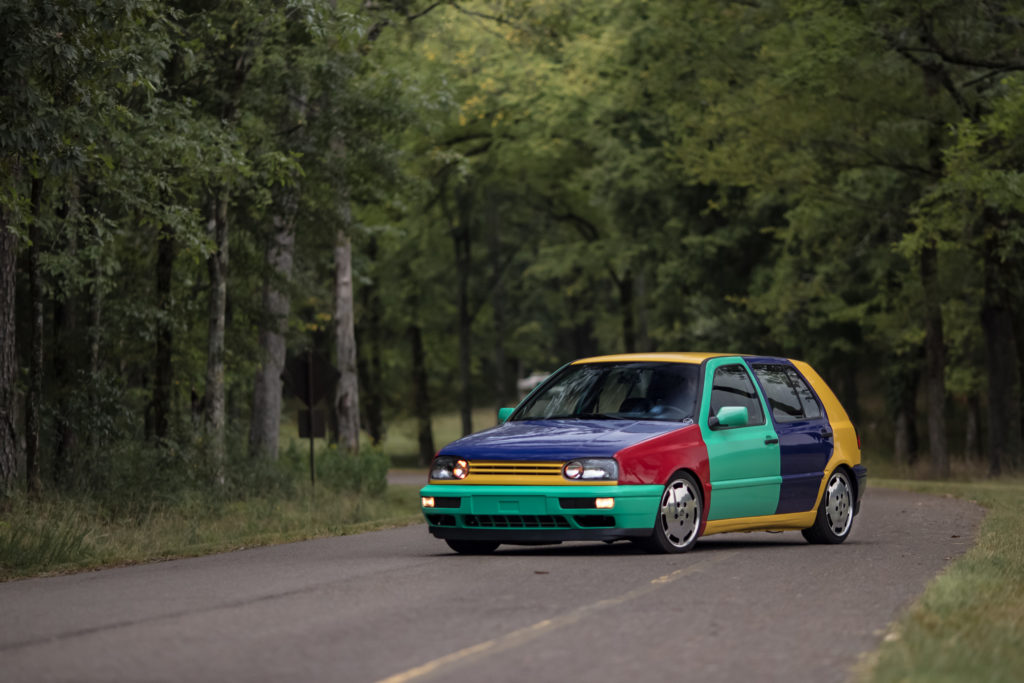
S&P’s take on a VR6 Harlequin.

Almost everyone has seen one, whether or not they knew it was a purpose built car and not an accident, who knows…

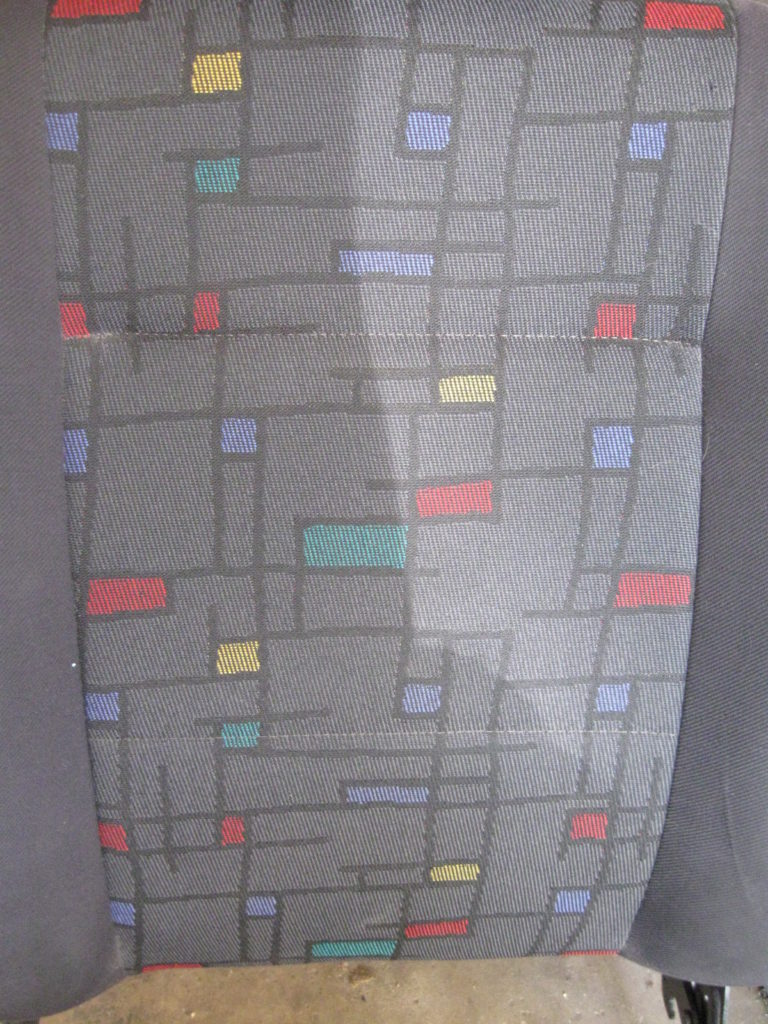
In 1996 Volkswagen built a small batch of cars for a promotional purpose. They were built on a 4 door Golf GL chassis, the only real interior difference was the seat upholstery, it was the same fabric used in the “joker” trim on European models of the same era.  The outside is where the “magic” happened, VW took panels from 4 base color cars (Red, Blue, Green and Yellow) and swapped the removable panels between the other base color cars, leaving you with a very loud exterior.


Fast forward to 2015, and I have an opportunity to buy a very sad, yellow base harlequin locally.  It had been resprayed at some point to be all yellow, but the colored panels were peeking through the worn paint.  The driveline was tired, the interior was beyond tired, it was time for either a restoration, or euthanasia…

I sent the car off in pieces to my local painter, he began smoothing out life’s abuses and owners neglect, fixing shopping cart dings, and poorly placed jack stands.  We needed a new hatch, or at least a tub that wouldn’t fall out every time you closed the hatch or went over a bump.

I found someone parting a 4 door golf, that had a lot of Euro market parts, hatch, bumpers, core supports, rebars, etc.  We took it all.

Next on the list was the interior, after looking and not finding anyone wanting to sell their limited edition seats, I spoke with Kip at Loves Trim Shop and worked out a plan for some new threads.  Mk2 Recaros on mk3 bases, leather wrapped, suede inlays and stitching to match the colors outside, without making the interior too loud to enjoy driving it.

That left me to get started on the driveline, the stock ABA was no different in the harlequin cars than it was in a standard Golf GL.

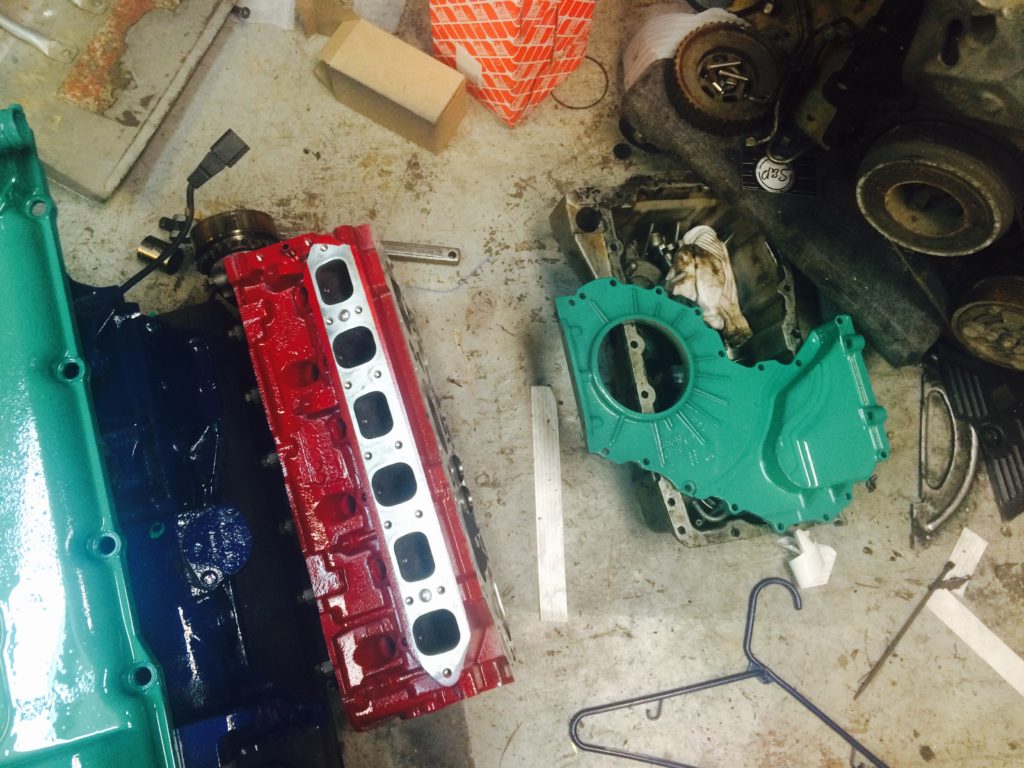
I had a 2.8 24v from a GTI that was wrecked, I had the machine shop go through the block, hone and a ring job, new bearings, new chains, guides, gaskets etc.

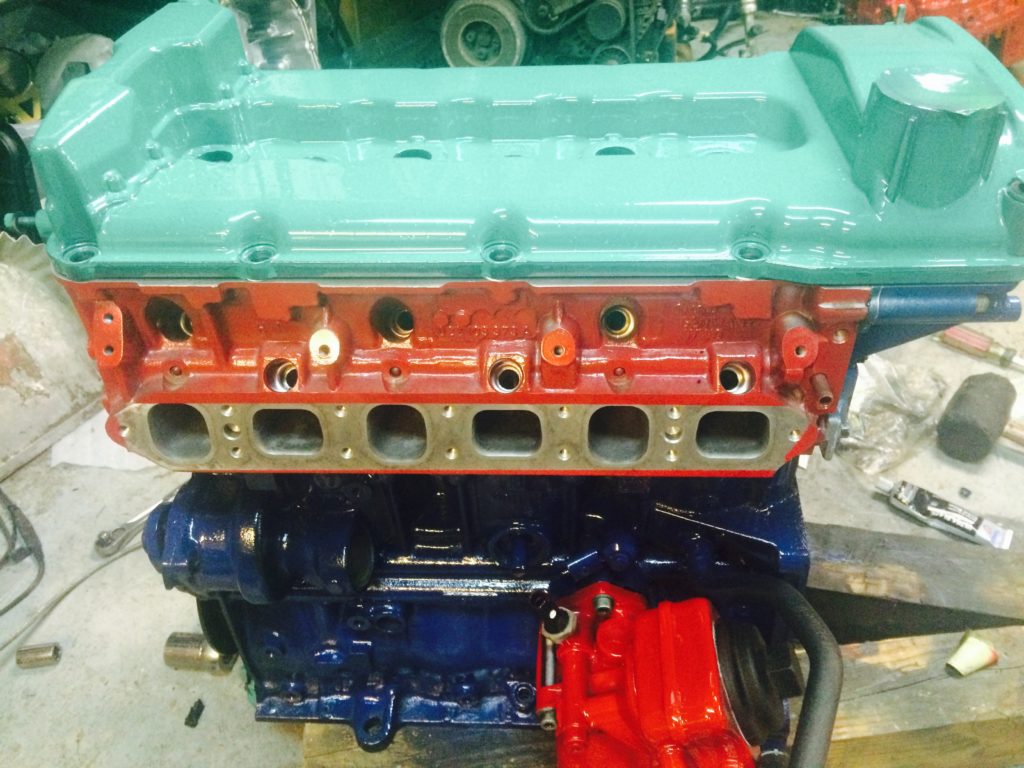
I couldn’t help myself, since I had it all in pieces I painted each section of the motor in the matching colors of the car, engine block, head, upper timing cover, lower timing cover, valve cover, intake, accessories, brackets…
I was seeing spots from all of the painting and planning.

Now that the car had been painted back to its original colors, engine painted and assembled and interior back from Love’s, it was time to make it a whole car again.
This is always the fun part, assembly is very gratifying.

Since the interior itself wasn’t very “loud”, Brandon Rosensteel at EuroGlow made an overlay for me.

Once the car was fully assembled, we could enjoy the best part of a vr6 swap – DRIVING!

During this build, a lady had contacted me about wanting to purchase the car when it was done. That is another story all together and arguably better than the one I just told you.
She and “Polly” now are in the Knoxville area, so if you see them, say hello!

Posted on

S&P Radiator and Intercooler Stack

We shortened up our dual pass radiator, and made it stockier, 2.5″ thick core, so that we could put a 21×2.5×3″ intercooler core on the top of it.  Now we can add a condenser to the front if we need to, or tuck it all the way under the core support and make some room for that 1.8t log manifold.

We should have this ready for shipment by mid to late February, we are sorting out the last bits of attachment points, testing outlet sizes and making piping kits for 1.8t and TDIs


IMG_4771 IMG_4770 IMG_4767


Keep your eye out for a purchase date!

Posted on

PowerFlex Poly Is Here!

Thats right, ditch the factory rubber for high density poly..


We have common kits bundled together, but all of the items are available individually, Control Arms, Steering Racks, Rear Beams, Strut Mounts, Sway Bars Ect…


For a limited time get FREE SHIPPING on all of our PowerFlex Parts!!


Mk1                                Mk2                                          Mk3                                      Mk4

mk1kit mk2kit


mk4frontstrutlowering

Posted on

Unleash the Beast! UnitedMotorsports is Here!

That’s right, S&P is now a United Motorsports Tuner, send us your timid, stock ecu and have it returned a beast in a box!  Pricing will be the same as if you went to UM directly, (no labor up charges or fees).


SPsolid unitedmotors

Posted on

Billet Coolant Sensor Adapters

These adapters are great if you are a mk1 owner with a mk3/4/5 swapped chassis and are needing to keep that mk1 cluster working perfectly.. Simply install this in one of the spare locations found in the coolant system, attach the included ground wire, thread your sensor into the adapter, attach your original signal wire and boom, a working mk1 cluster again!

They also work for aftermarket gauge installations for the mk3/4/5 owners, install the sensor into the adapter, ground the adapter with the provided ground wire, install into the coolant flange, enjoy an aftermarket gauge in your cockpit!

*sensor thread size is m10x1*


$24.00 shipped in the USA Check them out HERE

Posted on

12v Vr6 Coilpack Relocation Kit

Tired of looking at those spark plug wires on your 12v VR? Running a SRI or an intake without the wire retainers?  Install our coil pack relocation kit and  using your stock wires, the coil will now mount where the SAI pump was.  Included with out mounting bracket is an SAI delete plug for either AFP or AAA (choose which one you have when adding it to your cart.


Get them HERE !!!

5243034 (2)image

Posted on

S&P Digital to Analog Tach Converter/Adapter with Cylinder Correction

Here is our “magic” box !! Its a dual purpose unit and has 2 modules in it, digital>analog + cylinder conversion. It’s used for many applications, putting a VR6/1.8t/TDI/2.0 into a mk1/2 and retaining your factory cluster.  (However if you wanted to drop an ls1 into your mk1 and drive the stock tach, this will do it for you)


This module will allow your factory cluster to read the correct rpm of the engine. It will save time on not having to do a dash swap or retrofitting the 6 cylinder cluster and allow you to maintain that stock sleeper look inside your mk1 or mk2.

In stock and ready to ship HERE


We are going to test soon on vanagon, beetle ect for those running subaru or late model swaps in their aircooled beasts..

Posted on

Summer Software Sale

It’s time for a summer sale, if you are thinking about a mk4 motor swap for your mk1, we are offering 20 percent off your wiring harness work or ecu tuning when you purchase an integration kit from us. This offer is good until around mid August. Purchase of the integration kit must be between July 10 and August 15, your harness can be scheduled up to a month after that. image image


Posted on

S&P Radiators For Your MK1 Swaps

So you’ve installed your new mk4 powerplant into your mk1, now you are left with plumbing it in.  Some swaps (vr6 specifically, the TDIs dont fit well either.) require you to modify the radiator, and finding stock hoses that will work can be a scavenge-fest.

We have used a stock mk1 rabbit radiator flipped upside down, then you have to cap the overflow port, and it wants to leak eventually, not to mention that your temp switch is now across the engine bay and in the way of everything you just installed..

Soo… we went looking for OEM options, found a dasher radiator that works pretty well, unfortunately the aftermarket support for Dashers is very small.  There seems to be little to no stock of the replacement dasher radiators anymore. Leading us to our natural course of action, make something that works the way we want.


In about 1-2 months, we will be stocked with a new radiator for your swaps.  Fully tig welded endtanks, no plastic all aluminum construction coupled with the dual pass design will help keep your rabbit running cool. Stock mounting pins and core-support mounting tabs are in place.  We also have removed the overflow port as most mk4 based swaps have a port on the motor or in the factory hoses.

These will also work for those who want to run carbs or ITBS and are using some sort of an overflow container.


dualflowvw search rescue 2sciroccorad2sciroccorad1sciroccorad3


Posted on

The rebuild of a 96 harlequin

We will be documenting (as we can) the rebuilding process of a 96 VW Golf Harlequin edition.  Full respray, updated driveline and a refreshed interior..   All chassis parts will be refreshed with new parts.

This is chassis number 101 of 264 produced in 96 only as a Volkswagen promotional vehicle.


Our friends at RossVW have a great write up and history of the harlequin model.  Check them out! http://www.rossvw.com/harlequin/


Back to Project VRlaquin

We received the car in less than a desirable state.  At one time it had been resprayed (poorly) yellow over its colored panels.  The joker seats were in rough shape, it had the usual mk3 rotten floor boards, a fallen door hinge and crushed rocker. vrlaquin6
vrlaquin4vrlaquin5


OFF TO PAINT!!


vrlaquinvrlaquin2

vrlaquin3


More updates coming soon! Stay Tuned!


Red panels —- Eurohatch (no more problems with the NA license tub) not pictured are the red fenders!!


vrlaquin15    Looks alot like a part of a discarded “Golden Arches” campain right now.. Needs those other two colors..

Blue panels came from the paint shop next!!

vrlaquin11  Blue parts looked amazing in the sun, they should have used Chagall blue on more of the VAG line.  This harlequin is really coming together..

vrlaquin14

vrlaquin13 vrlaquin12


Three Of four colors completed now!! vrlaquin10

Green Parts have arrived!!! vrlaquin9 vrlaquin8 vrlaquin7  Now we have all four colors! We cant/wont hang the green panels until we are done sorting out the wiring harness in the drivers floor panel..

next up motor assembly and painting of the parts for the driveline..